Friday, July 29, 2011

A Variety of Things...

I'm still working towards a goal, so last night, I made several different things!  So... let's go!

The first is a card I made where I actually used the negative of the ladybug from Just Because I needed a lady bug for another project, and thought, well, might as well be able to use the negative and the positive, right?  (I have wasting things!)  So, The negative of the ladybug with some white flowers, with hole punched red paper for the center and a stamp that was in my stash.  Oh, and some scrap ribbon I had.  I also recently bought a white chalk-ink pad so I used that for the stamping and inking.  I am totally diggint the whte stamp pad!


Next are two cards that I made using a cut from Designer's Calendar!  I don't refer to this cart often enough!  It has some really cute images on there, not just for Calendar making!  :o)  I cut the image in two different patterns and made two cards with it.  I like how it turned out!  Simple, but it works!  I tend to lean more towards doing simpler cards, sometimes too much messes with my head!  :o)  The inside is stamped with "It's Your Day!" 


I <3 Shoes!    I love this little journal I made!  The background paper doesn't show up well but it is a really pretty purple strip, with a yellow and white plka-dot shoe, and the "I<3SHOES" is Welded together using Plantin Schoolbook.  The shoe is from Gypsy Wanderings.  I think it turned out kind of cute!  I must say, I do not <3 shoes.  I am a flip flop girl in the summer and a hiking boot girl in the winter.  I know one extreme to the other, but I know plenty of people who <3 shoes!  Ha! 


Lady Bug Journal - Ok, this is the positive of the image from Just Because I cut from my previous card.  I sparkled up the inside of her spots, and welded the words "lady" from Lyrical Letters.  I kind of like this little cutie!


Butterfly Journal - Background paper was in my scrap bin, and I stamped some swily design in each corner.  The butterfly is from Sentimentals, and I used scrap paer for her as well!  I like the colors on the butterfly... maybe it's just me, but I think it's a sweet lil' journal! 


Last but not least...  whew, I know... the owl journal.  The owl is from Sentimentals as well.  I am totally loving this little guy, right now, even though he was a pain in the behind to do... and let me tell you why.  I had cut all of these images used in this post and did all the noisy stuff before my hubby goes to bed.  So I used my Gypsy, sized everything, arranged all my papers on my cutting mat, and was ready to start assembling these journals.  Well, I realized after my hubby went to bed that I forgot to cut out the layers of the wings, and the larger areas around his eyes that go up to his ears and the brown for the branch the owl sits on.  Normally wouldn't be a problem, BUT with the way we set up my craftroom, The desk that hubby built for me is in a large nook inthe room, and right on the other side of the wall, is our bed, my hubby's head, where he sleeping.  Ever woke a grumpy bear?  Anywho...  So the layers in yellow, yes it was yellow before it was inked, and kind of looks like a shade of green in this pic, were all cut by hand, the old-fashioned way with a pair of scissors.  I will say they were Cricut Brand scissors, so it was cut by Cricut, but holey moley, I will never make that mistake again... So I winged it!  Get it, "winged" it?  You kow, the layers, wing....  WOW - I need to get some sleep....


So that is all (for now)!  There will still be more to come! 

Thank you for looking!  I really appreciate the time you spend here, it means the world to me!

Paper Love and Hugs,
Mary

Thursday, July 28, 2011

Christmas in July

The weather here is undoubtedly hot!  Highs in the upper 90s and high humidity doesn't really make for a feeling of Christmas, but I wanted to make some anyway!  I should have listened to the song by Jimmy Buffett's "Christmas in the Carribbean" while making these because that sure is what I felt like!  

So here are the thre 3 versions of Christmas card I made, and in showing these I think I need a bit of advice as well on one of them, so I am open to suggestions!

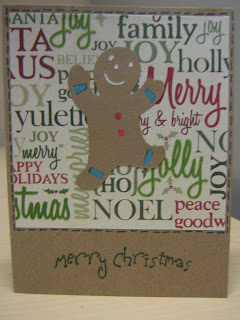
I will start with my Gingerbread Man!  The background paper on this is a fun pattern and kind of shimmery (although you can't really tell in the picture!  And, the bright green that you see (in the words "Jolly," "Joy" and the end part of "Christmas") is fuzzy!  Too fun!  So I thought a Gingerbread Man from Stretch Your Imagination would be appropriate.  I just colors him in with marker and my white gel pen.  The "Merry Christmas" Stamp is one I have had in my stash as well and thought the fun font of that stamp would work well!  A little doodling, and done!


My next card is a bit more sophisticated looking, but the same style as the Gingerbread Man!  This background paper doesn't have any fuzziness to it, but I like what the text was on the paper.  The big "Believe" is what sold it for me.  That could mean many things.  believing in Santa, believing that Reindeer can fly, believing in the magic that is Christmas, or believing in the true meaning of Christmas.  Because the paper looked more sophisticated, I decided to cut the beautiful reindeer from my Christmas cartridge that was free with Gypsy upgrade.  I have been wanting to use this guy for a while (okay since last year when I did the download) but I thought this year I am going to use him!  The "Believe" stamp was once again in my stash and I loved that font as well (there isn't much I don't like is there?).  A little doodling and done!


Alright, my last one (I swear I am almost done!) Is more along the fun lines, but this is where some advice would help me out a lot!  My hubby and I LOVE Christmas lights, as a child my hubby's parents would deck out their house, and I have seen picutres.  It is clearly reminiscant of the Griswald house in National Lampoon's Christmas Vacation.  He was with me at Joann's one day, and he pulled this paper off the rack and said "I love it."  I had to buy some and thought it would be perfect to cut out a cute Christmas Tree and put it over top.  The background shape of the light paper is a frame from Storybook, while the tree is cut from Designer's Calendar.  I love this fun, funky tree...  However, once I put it together, the tree kind of gets lost.  I want to keep it simple, but would love ideas on how to make the tree stand out a bit more.  It's too narrow to pop-dot (already tried that), but don't want to go too crazy with embellishments (as mass producing these suckers would take forever!  Any suggestions? 


I hope you enjoyed looking and THANK YOU from the bottom of my heart for stopping by!  I really appreciate your time!

Hugs and Paper Love,
Mary

Monday, July 25, 2011

ANNA and BRYSON

What a fun project, or should I say projectS! 

I made these to go along with my big something that I am doing - will tell all about it later...  But I am super excited about these!  These are 5x7 frames I bought, bare wood (don't worry will be painted but couldn't take it any longer so I had to take a pic and post...) and decorated the inside of the frame with cute-sy stuff! 

The first one is for Anna Faye, my niece, and I've wanted to make her something like this for a while now.  She will be 2 in December and I can't wait!  Precious little baby girl - she is adorable!  So, anywho...  I am going to go down the list of what carts I used for what:  Tree is from Just Because (swing cut off), Elephant is from Create A Critter, as are the grass pieces, clouds and the 2 lil' butterflies.  The latters are from Storybook.  The frame is a tag from Gypsy Wanderings and I welded a marquis shape in the middle of it with my Gypsy.  The hearts on the tree are from Plantin Schoolbook. 


The second one is for a friend of mine at work who's little boy is turning 1 in August, Bryson.  His first Borthday Party is going to be "monkey themed."  and I remember from her baby registry they had registered for safari themed stuff.  So I used my Create A Critter and made a couple of monkeys, and cut out the vines as well, then used Designer's Calendar for the font ( a little less girly than my other fonts).  A little inking and doodling and it is done! 


Thank you so much for taking the time to look! I really appreciate it!  .

Crafty hugs!
Mary

Thirty-One inspired "It's a Boy!"

My dear SIL is going to a baby shower this coming weekend for a friend of hers.  For the shower gift she bought a little bag from Thirty-One with the "Cheeky Elephant" Pattern on it and she is going to fill it with a bunch of goodies for the new arrival!  She asked if I could make a card for her, ok, lie... I said "do you need a card?!"  Wink wink, nudge nudge...  Love you Leslie!  So here is the Cheeky Elephant Pattern:


I just love the bright colors!  So great for kids!  So I pulled from the bright colors and made a coordinating card (tried to atleast!)  Yes, I used Create A Critter, again...  I know, I know.. but I also used Beyond Birthdays (haven't used that one in a while) for the "it's a boy."  The background frame is from Just Because Cards.  The ears on the little elephant is pop-dotted with a little doodling.  The grass is from Plantin Schoolbook, and added a bit of ribbon.  I love the colors on this little guy and hope my SIL likes it too!  :o)


Thank you for looking!  Have a great day! 
Mary

More Kids' Cards...

Ever since I bought Create A Critter, I have been obsessed with it... slightly!  I have made some example kiddo cards to have around for the big project I am working for!  (More on that later) 

The first is a girly she's expecting card that could be used for a shower invite or a shower attendee!  I used the little lamb from CAC and Cuttlebugged her.  I tied a little bow on the top, and used my new corner punch and my dollar She's Expecting stamp.  Totally simple, but I love this little lamb - Insert Mary has a little lamb jokes here!  I've heard plenty in my day! 


The next one is a sample invite/Happy Birthday for a little boy (5 was a random number chosen)  The alligator and bird are from CAC as well, so is the balloon.  I used to Xstithing floss to tie the ballon as if the bird was holding the balloon.


More to post in a minute!  Thank you for looking!  :o)

Have a Crafty Day!
Mary


Wednesday, July 20, 2011

I've been a little busy...

But not too busy for crafting!  I am working on something big... well it's a big deal to me and am excited but also very nervous about it... more on that later!  :o)  So I thought I would post everything I have been working on.  Which doesn't seem like much, but at the same time, there is so much more that isn't finished yet either.  So here are my latest projects that I wanted to share with you...  I hope you enjoy! 

10 Thank You Cards

I am trying to build up my stash...  I mean really build it up, so I made 10 "Thank You" cards.  I made something similar to these a while ago, liked the style so much and have been wanting to make more, so I did!  All of these were cut using the marqueee cut from Storybook, one slightly smaller than the other, layered then folded.  I think it makes a simple, but cute little shaped card!  The "Thank You's" are made using several different fonts from Lyrical Letters and Cindy Lou, welded together using my Gypsy and cut out.  Some are inked, some are colored in, some using the positive of the cut, some using the negative.   Lots and lots of doodling on all of these... 

all 10 cards...

Some stand upright and open like a standard card... 


...others open top to bottom.

Birthday Card Using Stand and Salute

I decided I need to use this cart more often, so that's what I am trying to do.  The Shooting Star is from Stand and Salute and I just cut the image again slightly smaller so I could layer it.  And oh boy... Mary used glitter!!!  There is a bit of small speckled glitter on the pop-dotted star (I know it's hard to tell) but for a non-glittery kind of girl, I stepped outside the box and am kind of pleased with the results!  I may have to use this more often!  The inside of the card says "it's your Birthday and used leftover white stars from my 4th of July card to decorate the inside.  Very simple card, but still cute (I think).
 
Can you see the little flecks of glitter?  They are barely there, but they are there!  :o)  Hey, it's a start!

Create A Critter Baby Shower Invitations

Oh yes, Mary went shopping, to a craft store, and bought a new cartridge!  I have been wanting Create a Critter for some time now and darn it, I just bought it, for me, for no particular reason! Oh, and there was another purchase of my first ever corner rounder/punch decorative thingy... what do you call those things??  I wanted these to be simple, after all, I know no one who is pregnant at the moment, who is having a shower, but just wanted them as examples.  The "She's Expecting" stamp I bought in the dollar bin at Michael's years ago, but it still comes in handy every once in a while!  The lion is more of a baby boy baby shower and the giraffe could be generic...  I dont know.  I have another one at home I am working on for a baby girl baby shower... but that one is not done yet!  :o)


~ MORE JOURNALS ~

I have been on another journal kick lately as well...  All of these journals are made from scrap pireces of paper (you know I love it)!

"Dream" Journal
The Dream on the first one is cut from Gypsy Wanderings.  Now I didn't know which paper to use for the word "Dream" because I loved the colors in the background paper, and didn't want it to clash, so I cut a piece of ivory cardstock, and inked it with my Martha Stewart ink (oh my another purchase for Mary!??!?! {if you know me you know I don't go shopping often, almost at all... for anything - so kind of a big deal!})  I then took my Tim Holtz Vintage Photo ink pad and just made lines across the words... I like the effect and I think it matches the background paper well! 


Home is Where Your Heart Lives (4x4)

The Birdhouse cut from Stretch Your Imagination, and I used another stamp I have had for years from the Michael's dollar bin, as well as the two little birds I bought from Joann's dollar bin more recently.  I went over the stamp with a brass kind of colord pen.  I like botht he bright colors of the birdhouse mixed with the inking and my attempt at making it look distressed.  I doodled a little heart in the center of the birdhouse as well. 


Flourish Journal (4x4)

The flourish on this journal was cut from Cindy Lou with layers...  The picture doesn't show it well, but the main colors on the flourish are a really pretty purple and a dark chocolate brown.  I like the simplicity of it, but the bit of complexity that the flourish offers. 

Window Scene with Flourish (8x8)

This is an 8x8 journal I have made but have not bound yet... I can't decide what color to put on the inside covers of the journal, but once I figure that out, I will finally bind it...  A simple square, with a frame from Just Cindy Lou, or Just Because, I don't remember wleded inside the square with my Gypsy.  The corner "flourish" is from Storybook, and doodled the inside of those a bit.  Then I cut the clouds from stand and Salute, the grass from Plantin Schoolbook, layered 4 times and inked, the little flowers are from Create A Critter and inked, and the tree is from Gypsy Wanerings (foilage cuttlebugged and trunk inked).  I feel like I need a bit more on the frame though and don't know what.  The spaces in between the corner flourishes look very bare... perhaps some more doodling, another cut, some more flowers... I don't know... ANY IDEAS?  I am open to all suggestions!  Please suggest away!  !  :o)


WHEW!!!  Deep breath...  Ok, that is it, for now...  I am still crafting, I just haven't been online posting anything lately, but have LOTS more in the works!  I promise!  I am on a kick, preparing myself for...  more  info later!  :o)

I hope you enjoyed taking a peek and didn't mind my ramblings too much!  I appreciate the time you spent to look through my creations!  It really means a lot to me!

Happy Crafting and enjoy your day!  :o)

Mary

Tuesday, July 12, 2011

Cheers To You - Happy Birthday Cupcakes

Hello everone!  Yes, I am still on a cupcake kick!  I made these three cards for my stash, from my scrap stash!  I love how that works out!  :o)  The brown cupcake paper I bout at Joann's a looong time ago and it was pre-embossed with cupcakes and little raised dots.  I honestly forgot that I had some of that leftover!  When I came across it I must admit, I was really excited because I haven't seen it at the store since!  :o)  To make the cupcakes "pop" a bit more I used different color shimmer pens to accent the raised part of the image and a few of the raised dots.  I used a scrap piece of stiped paper as well as some diamond patterned background paper.  Now, on all three cards the top part of the card has the same pattern to it (although the paink is a faint design) - but I love how all of these have the same pattern, but they're different!  I cut the word "Cheers" from Wild Card in coordinating colors and wrote with the same shimmer pen "to you" underneath.  A little bit of doodling, and they were finished, oh but a little bit of ribbon never hurt anyone, right?  :o)

Thank you for looking!
Mary


Monday, July 11, 2011

I made cupcakes... then I made cupcakes! :o)

Is it obvious I was on a cupcake kick this past weekend?  I haven't baked anything in quite some time, so this past weekend I decided I was going to bake cupcakes!  To me, there's nothing better than a standard white cupcake with buttercream frosting.  There is just something so simple and wonderful about it, it's hard to explain!  While I am a girl who loves, I mean, LOVES chocolate, sometimes simple is better!  Saturday morning my house smelled like cake!  That alone was exciting!  I used my Mama's buttercream frosting recipe, which to me is just comfort!  :o)  One of my hubby's buddies came over Saturday night and he ate five of them!  Then my hubby said (knowing better) "did you make frosting or did you use canned?"  Then my hubby got the look - you know which one I am talking about!  So here are the cucakes I made and I even broke out some star sprinkles and put a few on top.


Now, on to the crafty stuff inspired by the baking of cupcakes!  I made these two cards (figured if I am making one, I might as well make two for my stash, right?)  I used the scallop ocal from Storybook cut at 4" for the oustside and 3" on the inside.  The cupcake is from Wild Card, and the frosting is embossed.  The ovals are inked, and I just wrapped some ribbon around the oval and tied a small piece around the candle.  The sentiment is hand-written.  Normally, I do not post pictures of what the inside of my cards look like, but thought these came out really cute!  The inside has the 3" oval scallops with a hole punch to resemble a tag, with the same color ribbon on the inside, and I used two different stamps for the inside sentiment.  One is the cupcake which I have had for years and don't remember what brand it was.  The "enjoy!" was a sentiment on another stamp that had a sundae above it.  I wanted the "enjy!" but not the sundae since I wanted to stick with the cupcake theme!  I just inked hald of the stamps and prayed that it would work out and it did!   I really like how these turned out and I hope you like them as well! 

Thank you as always for taking the time to look!  It means a lot to me! 
Mary


Tuesday, July 5, 2011

God Bless America!

I hope everyone had a safe and happy Independence Day!  It was quite the busy weekend around here!  I spent the better part of the day with my Dear Mama at her house on Saturday and we had a great time!  We did some crafty things, had lunch, and just hung out.  I love how we can just "be" together.  Then on Sunday my hubby went fishing, I cleaned up the house, we rented a couple movies, and Sunday we went swimming!  It was a fun time, but so sad it is over!  :o(  Oh well...  I did have a chance to do a little crafting, but not much over the weekend.  But I was thinking about how thankful I am for my family, my country, my freedoms because so many defended, fought, and died so that we can live the way we live.  I am thankful for those who serve our country so courageously and stand up for what is right.

Anywho...  :o)  I made this card on Sunday, to celebrate the 4th of July.  All cuts are from Stand and Salute except for the frame which was a tag from Gypsy Wanderings that hid the image from GW, and welded a rectangle to cut out the inside.  I added some red and blue ribbon as well as some doodling on the "God Bless America" and on the little flags, as well as some Cuttlebug on the frame.  A few pop dots later, - done!  I hope you like it! 

Thank you for looking!
Mary